If you are new users of Cisco ASA 5500-X Series Next-Generation Firewalls, are you familiar with the ASA 5500-X Series configuration? There are different Cisco ASA CX models available in a wide range of sizes, for small offices, branch locations, and Internet-edge deployments.
In this article, we will share the simple start guide of Cisco ASA 5500-X Series, including the model ASA 5512-X, ASA 5515-X, ASA 5525-X, ASA 5545-X, and ASA 5555-X.
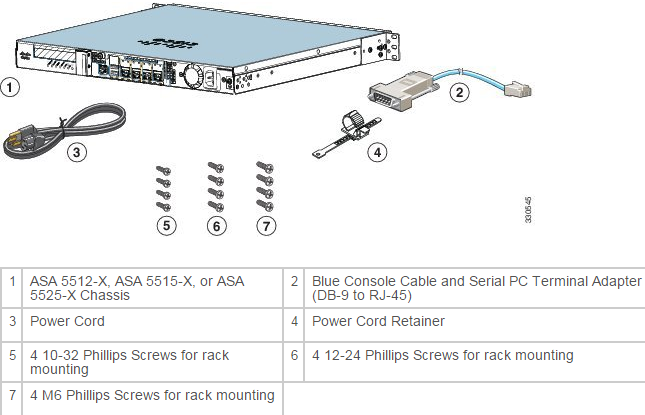
First of all, let’s check the main package contents of ASA 5512-X, ASA 5515-X, or ASA 5525-X, ASA 5545-X and ASA 5555-X.
ASA 5512-X, ASA 5515-X, or ASA 5525-X
ASA 5545-X and ASA 5555-X

Note: The contents are subject to change, and your exact contents might contain additional or fewer items.
Power on the ASA
The power turns on automatically when you plug in the power cable; do not press the power button on the front panel. (For older models, the power does not turn on automatically; check the hardware installation guide for more information).
3. Check the Status LED on the front of the ASA; after it is solid green, the system has passed power-on diagnostics.
Modify the Initial Configuration for the Software Module (Optional)
The ASA ships with a default configuration that enables Adaptive Security Device Manager (ASDM) connectivity to the Management 0/0 interface. When you use a software module such as the ASA FirePOWER module, we recommend that you do not use the default configuration, which can preclude the module from reaching the Internet for updates. This section describes how to apply a new configuration so the module can access the Internet. This configuration also enables a basic usable configuration for an inside and outside network.
The following figure shows the suggested network deployment for the ASA 5500-X with a software module:
Note: If you have an inside router instead of a switch, you can skip this section and instead configure the ASA to route between management and an inside network. In this case, configure the ASA and the module Management 0/0 IP addresses to be on the same network. Be sure to configure appropriate routes on the ASA and on the module so the management network can reach the inside network, and vice versa.
This procedure lets you connect to the ASA console port and paste in a new configuration that configures the following behavior:
- inside --> outside traffic flow
- outside IP address from DHCP
- DHCP for clients on inside
- Management 0/0 interface is Up, but otherwise unconfigured. The software module can then use this interface to access the ASA inside network and use the inside interface as the gateway to the Internet.
- ASDM access on the inside interface
To achieve the above configuration, perform the following steps.
1. Connect your computer to the ASA console port with the supplied console cable. You might need to use a third party serial-to-USB cable to make the connection.
10. Cable the inside GigabitEthernet 0/1 interface, Management 0/0 interface, and your computer to a Layer 2 Ethernet switch.
12. For software module configuration, see the ASA FirePOWER quick start guide, ASA CX quick start guide, or IPS quick start guide. Use the following network settings for the module:
4. Launch ASDM
Using ASDM, you can use wizards to configure basic and advanced features. ASDM is a graphical user interface that allows you to manage the ASA using a web browser. See the ASDM release notes on Cisco.com for the requirements to run ASDM.
How to…
1. On the computer connected to the ASA, launch a web browser. If you are using the default configuration and did not use 3. Modify the Initial Configuration for the Software Module (Optional), you need to connect the computer to the Management 0/0 interface.
2. In the Address field, enter the following URL: https://192.168.1.1/admin. The Cisco ASDM web page appears.
ASDM-IDM Launcher appears.
…
The Full Cisco ASA 5500-X Series Start Guide you can read the http://www.cisco.com/c/en/us/td/docs/security/asa/quick_start/5500X/5500x_quick_start.html
More Related